Installing Longhorn on Kubernetes
Install Longhorn on Kubernetes, create RWO/RWX StorageClasses, test PVCs, expose the UI via Ingress, and back up volumes to object storage.
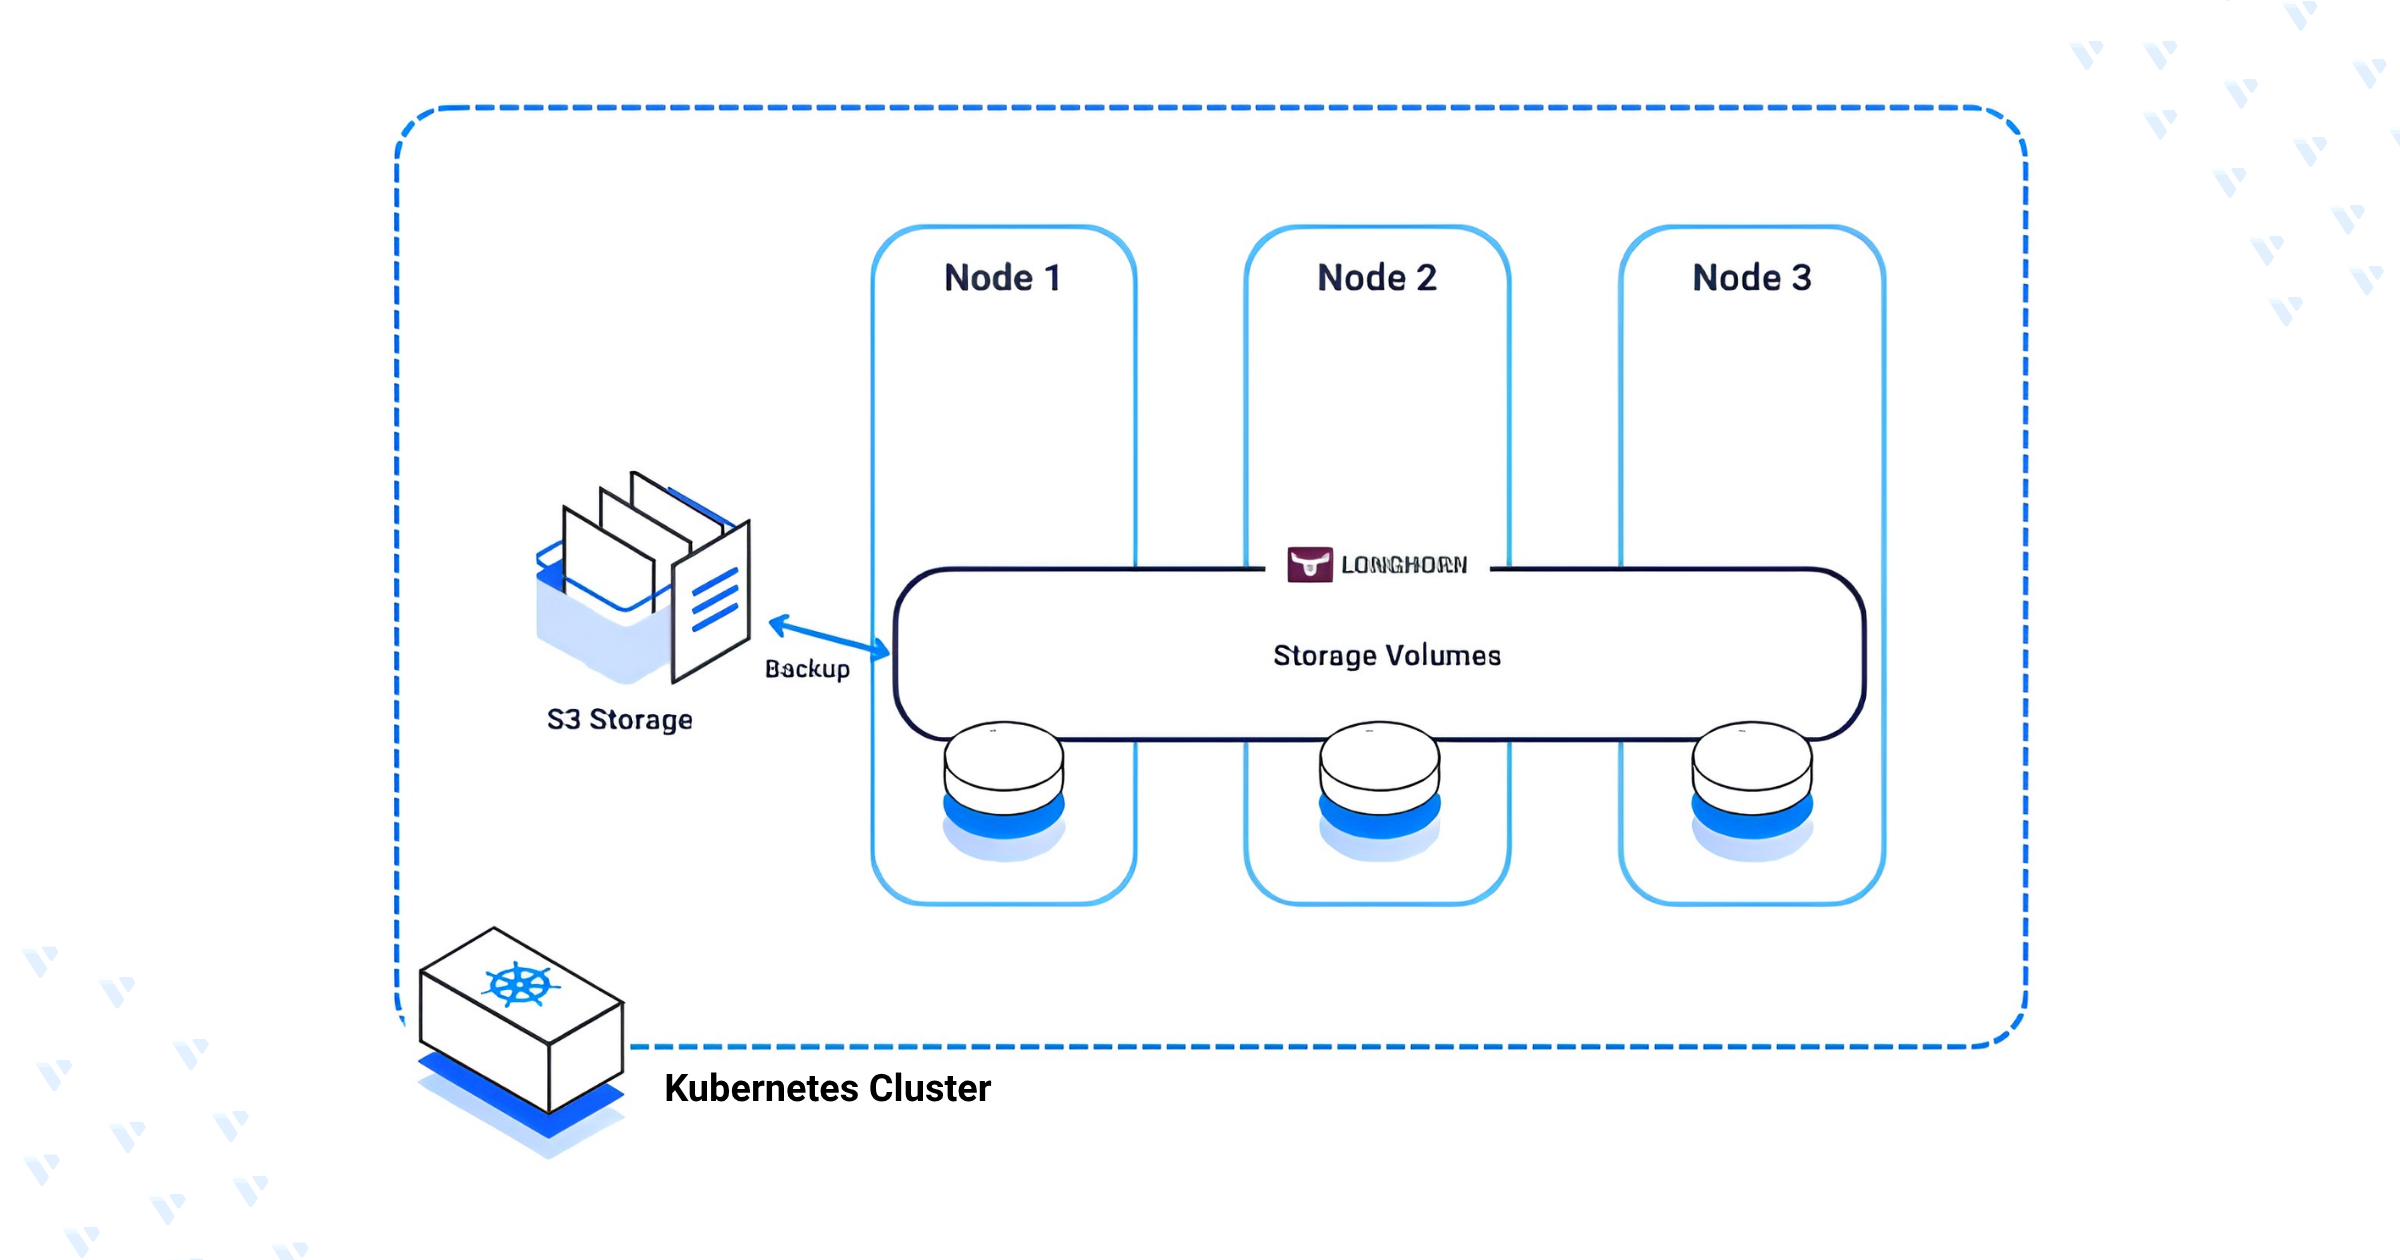
Longhorn is an open-source, lightweight distributed block storage system for Kubernetes that provides persistent, highly available storage for stateful applications running in a cluster. It runs a CSI driver, an instance manager on every node, a storage engine that replicates data and creates snapshots/backups, and a web UI for managing volumes. This guide walks through installing Longhorn on a Kubernetes cluster, creating ReadWriteOnce (RWO) and ReadWriteMany (RWX) StorageClasses, provisioning and testing PVCs with sample pods, exposing the Longhorn UI externally through an Nginx Ingress controller, and configuring volume backups to S3-compatible object storage. By the end, you'll have Longhorn running as your cluster's distributed storage layer, with tested RWO and RWX volumes, a browser-accessible dashboard, and automated backups to external object storage, following distributed Kubernetes storage deployment practices documented in Vultr Docs.
Prerequisites: a Kubernetes cluster with at least 3 nodes (4 vCPUs each), S3-compatible object storage with a bucket (e.g.
longhorn) for volume backups, a Linux management workstation with SSH access as a non-root sudo user, andkubectlinstalled and configured to reach your cluster.
1. Install Longhorn on Kubernetes
You can install Longhorn with Helm or kubectl. The steps below use kubectl with a pinned release manifest.
1. Download the latest Longhorn release manifest:
wget https://github.com/longhorn/longhorn/releases/download/v1.6.1/longhorn.yaml
This downloads Longhorn v1.6.1 — check the GitHub repository for the latest version before deploying.
2. Verify the file downloaded:
ls
Output:
longhorn.yaml
3. Deploy Longhorn to your cluster:
kubectl apply -f longhorn.yaml
A successful install creates CRDs, RBAC roles, services (longhorn-backend, longhorn-frontend, etc.), a longhorn-manager DaemonSet, and longhorn-driver-deployer/longhorn-ui deployments.
4. Verify all Longhorn resources are running in the new longhorn-system namespace:
kubectl get all -n longhorn-system
Example output:
NAME                                                    READY   STATUS    RESTARTS      AGE
pod/csi-attacher-57689cc84b-tlzpb                       1/1     Running   0             73s
pod/longhorn-csi-plugin-lp562                           3/3     Running   1 (15s ago)   73s
pod/longhorn-ui-655b65f7f9-lgllp                        1/1     Running   0             98s

NAME                                  TYPE        CLUSTER-IP       EXTERNAL-IP   PORT(S)    AGE
service/longhorn-admission-webhook    ClusterIP   10.100.203.235   <none>        9502/TCP   103s
service/longhorn-backend              ClusterIP   10.110.4.220     <none>        9500/TCP   104s

NAME                                      DESIRED   CURRENT   READY   UP-TO-DATE   AVAILABLE   NODE SELECTOR   AGE
daemonset.apps/engine-image-ei-5cefaf2b   3         3         3       3            3           <none>          84s
daemonset.apps/longhorn-csi-plugin        3         3         3       3            3           <none>          74s
daemonset.apps/longhorn-manager           3         3         3       3            3           <none>          100s
5. Install the Longhorn NFS package to enable ReadWriteMany (RWX) volumes:
kubectl apply -f https://raw.githubusercontent.com/longhorn/longhorn/v1.6.1/deploy/prerequisite/longhorn-nfs-installation.yaml
6. Confirm the NFS installation pods are running:
kubectl get pods | grep longhorn-nfs-installation
Output:
longhorn-nfs-installation-2kd6d   1/1     Running   0          43s
longhorn-nfs-installation-52kgg   1/1     Running   0          43s
longhorn-nfs-installation-qsst9   1/1     Running   0          43s
2. Create Longhorn Storage Classes
Longhorn ships with a default longhorn StorageClass, but you'll typically create dedicated classes per access mode so PVCs can target the right one.
ReadWriteOnce (RWO) StorageClass
RWO mounts a volume with read-write access on a single pod at a time — suitable for workloads like databases that need consistent writes to a single writer.
1. Create the StorageClass file:
nano rwo-storageclass.yaml
2. Add the following configuration:
kind: StorageClass
apiVersion: storage.k8s.io/v1
metadata:
  name: longhorn-prod
provisioner: driver.longhorn.io
allowVolumeExpansion: true
parameters:
  numberOfReplicas: "3"
  staleReplicaTimeout: "2880" # 48 hours in minutes
  fromBackup: ""
  fsType: "ext4"
reclaimPolicy: Retain
This creates an expandable StorageClass longhorn-prod with a Retain reclaim policy so the volume survives PVC deletion. Key fields:
provisioner—driver.longhorn.ioroutes provisioning through the Longhorn engine. A cloud block-storage CSI driver value here instead would create volumes that Longhorn can't manage.allowVolumeExpansion— lets you grow a volume's capacity later (e.g. 10Gi → 20Gi).numberOfReplicas— number of Longhorn volume replicas spread across nodes.staleReplicaTimeout— marks a replica dormant after this many idle minutes.fromBackup— restores the volume from a backup source (e.g. your object storage bucket).fsType— filesystem format for the volume.reclaimPolicy—DeleteorRetainbehavior when the bound PVC/PV is removed.
3. Apply the StorageClass:
kubectl apply -f rwo-storageclass.yaml
4. Verify it's available:
kubectl get storageclass
Output:
NAME                                PROVISIONER           RECLAIMPOLICY   VOLUMEBINDINGMODE   ALLOWVOLUMEEXPANSION   AGE
longhorn (default)                  driver.longhorn.io    Delete          Immediate           true                   35m
longhorn-prod                       driver.longhorn.io    Retain          Immediate           true                   4s
standard                            block.csi.example.com Delete          Immediate           true                   46m
(The standard row is just an example of a cluster's pre-existing default StorageClass — run kubectl get storageclass on your own cluster and substitute the real name/provisioner it shows.)
ReadWriteMany (RWX) StorageClass
RWX lets multiple pods mount the same volume with read-write access simultaneously.
1. Create the StorageClass file:
nano rwx-storageclass.yaml
2. Add the following configuration:
kind: StorageClass
apiVersion: storage.k8s.io/v1
metadata:
  name: longhorn-rwx
provisioner: driver.longhorn.io
allowVolumeExpansion: true
reclaimPolicy: Delete
volumeBindingMode: Immediate
parameters:
  numberOfReplicas: "3"
  staleReplicaTimeout: "2880"
  fromBackup: ""
  fsType: "ext4"
  nfsOptions: "vers=4.2,noresvport,softerr,timeo=600,retrans=5,rw,hard"
reclaimPolicy: Retain
This creates the RWX StorageClass longhorn-rwx, which uses Longhorn's NFS share-manager pods to support simultaneous multi-pod read-write access. nfsOptions is the main addition that enables the extra NFS mount options RWX volumes need.
3. Apply the StorageClass:
kubectl apply -f rwx-storageclass.yaml
4. Verify it's available:
kubectl get storageclass
Output:
NAME                                PROVISIONER           RECLAIMPOLICY   VOLUMEBINDINGMODE   ALLOWVOLUMEEXPANSION   AGE
longhorn (default)                  driver.longhorn.io    Delete          Immediate           true                   36m
longhorn-prod                      driver.longhorn.io    Retain          Immediate           true                   46s
longhorn-rwx                        driver.longhorn.io    Retain          Immediate           true                   9s
standard                            block.csi.example.com Delete          Immediate           true                   47m
3. Create Persistent Volume Claims (PVCs)
Longhorn dynamically provisions a volume whenever a PVC references one of its StorageClasses.
ReadWriteOnce (RWO) PVC
1. Create the PVC file:
nano rwo-pvc.yaml
2. Add the following configuration:
apiVersion: v1
kind: PersistentVolumeClaim
metadata:
  name: test-rwo
spec:
  accessModes:
    - ReadWriteOnce
  storageClassName: longhorn-prod
  resources:
    requests:
      storage: 10Gi
This creates a PVC test-rwo referencing the longhorn-prod StorageClass, which provisions a 10Gi Longhorn volume once mounted.
3. Apply the PVC:
kubectl apply -f rwo-pvc.yaml
4. Verify it's Bound:
kubectl get pvc
Output:
NAME       STATUS   VOLUME                                     CAPACITY   ACCESS MODES   STORAGECLASS    VOLUMEATTRIBUTESCLASS   AGE
test-rwo   Bound    pvc-4026f8d2-873c-429b-8068-208b26a75692   10Gi       RWO            longhorn-prod   <unset>                 4s
5. Verify the underlying PV:
kubectl get pv
Output:
NAME                                       CAPACITY   ACCESS MODES   RECLAIM POLICY   STATUS   CLAIM              STORAGECLASS    VOLUMEATTRIBUTESCLASS   REASON   AGE
pvc-4026f8d2-873c-429b-8068-208b26a75692   10Gi       RWO            Retain           Bound    default/test-rwo   longhorn-prod   <unset>                          8s
Only a single pod can mount and write to this volume at a time.
ReadWriteMany (RWX) PVC
1. Create the PVC file:
nano rwx-pvc.yaml
2. Add the following configuration:
apiVersion: v1
kind: PersistentVolumeClaim
metadata:
  name: rwx-pvc
spec:
  accessModes:
    - ReadWriteMany
  storageClassName: longhorn-rwx
  resources:
    requests:
      storage: 20Gi
This creates a PVC rwx-pvc referencing longhorn-rwx, provisioning a 20Gi volume that multiple pods can mount simultaneously.
3. Apply the PVC:
kubectl apply -f rwx-pvc.yaml
4. Verify both PVCs are Bound:
kubectl get pvc
Output:
NAME       STATUS   VOLUME                                     CAPACITY   ACCESS MODES   STORAGECLASS    VOLUMEATTRIBUTESCLASS   AGE
rwx-pvc    Bound    pvc-509f254e-255d-4aee-bdc1-8c10c6cc49f5   20Gi       RWX            longhorn-rwx    <unset>                 7s
test-rwo   Bound    pvc-4026f8d2-873c-429b-8068-208b26a75692   10Gi       RWO            longhorn-prod   <unset>                 3m10s
5. Verify the PVs:
kubectl get pv
Output:
NAME                                       CAPACITY   ACCESS MODES   RECLAIM POLICY   STATUS   CLAIM              STORAGECLASS    VOLUMEATTRIBUTESCLASS   REASON   AGE
pvc-4026f8d2-873c-429b-8068-208b26a75692   10Gi       RWO            Retain           Bound    default/test-rwo   longhorn-prod   <unset>                          3m31s
pvc-509f254e-255d-4aee-bdc1-8c10c6cc49f5   20Gi       RWX            Retain           Bound    default/rwx-pvc    longhorn-rwx    <unset>                          28s
All pods that mount rwx-pvc can read and write to it at the same time.
4. Test the PVCs
ReadWriteOnce (RWO)
1. Create an Nginx pod that mounts the RWO PVC:
nano nginx-rwo-pod.yaml
apiVersion: v1
kind: Pod
metadata:
  name: nginx-webserver
spec:
  containers:
  - name: rwo-container
    image: nginx:latest
    volumeMounts:
    - name: rwo-volume
      mountPath: /data
  volumes:
  - name: rwo-volume
    persistentVolumeClaim:
      claimName: test-rwo
2. Apply it:
kubectl apply -f nginx-rwo-pod.yaml
3. Verify the pod is running:
kubectl get pods
Output:
NAME                              READY   STATUS    RESTARTS   AGE
nginx-webserver                   1/1     Running   0          41s
4. Open a shell in the pod:
kubectl exec -it nginx-webserver -- /bin/bash
root@nginx-webserver:/#
5. Write a test page to the mounted volume:
echo "<html><body><h1> Hello World! Nginx Writes to the RWO Longhorn Volume </h1></body></html>" > /usr/share/nginx/html/index.html
6. Confirm Nginx serves it:
curl 127.0.0.1
<html><body><h1> Hello World! Nginx Writes to the RWO Longhorn Volume </h1></body></html>
Only this one pod can write to the volume at a time — others could mount it read-only, but not write concurrently.
7. Exit the pod:
exit
ReadWriteMany (RWX)
RWX is suited to workloads with separate reader/writer processes needing shared storage.
1. Create a backend pod that writes to the shared volume:
nano log-backend.yaml
apiVersion: v1
kind: Pod
metadata:
  name: log-writer
spec:
  containers:
  - name: log-writer-container
    image: busybox:latest
    command: ["/bin/sh", "-c", "while true; do echo $(date) >> /var/log/app.log; sleep 1; done"]
    volumeMounts:
    - name: shared-storage
      mountPath: /var/log
  volumes:
  - name: shared-storage
    persistentVolumeClaim:
      claimName: rwx-pvc
2. Create a second pod that reads from the shared volume:
nano log-frontend.yaml
apiVersion: v1
kind: Pod
metadata:
  name: log-viewer
spec:
  containers:
  - name: log-reader-container
    image: busybox:latest
    command: ["/bin/sh", "-c", "tail -f /var/log/app.log"]
    volumeMounts:
    - name: shared-storage
      mountPath: /var/log
  volumes:
  - name: shared-storage
    persistentVolumeClaim:
      claimName: rwx-pvc
3. Create a second writer pod to prove concurrent writes work:
nano updatelog-backend.yaml
apiVersion: v1
kind: Pod
metadata:
  name: updatelog
spec:
  containers:
  - name: log-writer-container
    image: busybox:latest
    command: ["/bin/sh", "-c", "while true; do echo Update from backend pod $(date) >> /var/log/app.log; sleep 1; done"]
    volumeMounts:
    - name: shared-storage
      mountPath: /var/log
  volumes:
  - name: shared-storage
    persistentVolumeClaim:
      claimName: rwx-pvc
4. Apply all three pods:
kubectl apply -f log-backend.yaml

kubectl apply -f log-frontend.yaml

kubectl apply -f updatelog-backend.yaml
5. Verify all three are running:
kubectl get pods
Output:
NAME                              READY   STATUS    RESTARTS      AGE
log-viewer                        1/1     Running   1 (37s ago)   59s
log-writer                        1/1     Running   0             64s
updatelog                         1/1     Running   0             51s
6. Confirm both writers are hitting the shared log:
kubectl logs log-viewer
Output:
Update from backend pod Tue Apr 30 18:48:19 UTC 2024
Tue Apr 30 18:48:20 UTC 2024
Update from backend pod Tue Apr 30 18:48:20 UTC 2024
Tue Apr 30 18:48:21 UTC 2024
Both log-writer and updatelog write concurrently while log-viewer reads — confirming RWX lets multiple pods share the same volume at once.
5. Configure Longhorn for External Access
Expose the Longhorn UI through an Nginx Ingress controller.
1. Install the Nginx Ingress Controller:
kubectl apply -f https://raw.githubusercontent.com/kubernetes/ingress-nginx/controller-v1.10.1/deploy/static/provider/cloud/deploy.yaml
2. Verify the controller pod is running:
kubectl get pods --all-namespaces -l app.kubernetes.io/name=ingress-nginx
Output:
NAMESPACE       NAME                                        READY   STATUS      RESTARTS   AGE
ingress-nginx   ingress-nginx-admission-create-n2gvf        0/1     Completed   0          98s
ingress-nginx   ingress-nginx-admission-patch-vqfhn         0/1     Completed   0          98s
ingress-nginx   ingress-nginx-controller-57b7568757-ctk5z   1/1     Running     0          99s
3. Wait a few minutes for the controller's LoadBalancer service to get an external IP, then check it:
kubectl get services ingress-nginx-controller --namespace=ingress-nginx
Output:
NAME                       TYPE           CLUSTER-IP       EXTERNAL-IP      PORT(S)                      AGE
ingress-nginx-controller   LoadBalancer   10.106.252.171   203.0.113.5   80:30886/TCP,443:32107/TCP   4m25s
The EXTERNAL-IP is your load balancer's public IP — point a DNS A record at it with your DNS provider. (Some cloud providers require a provider-specific annotation on the Ingress controller's Service before it provisions a load balancer — check your provider's docs if EXTERNAL-IP stays <pending>.)
4. Create an Ingress resource file:
nano longhorn-ingress.yaml
5. Add the following, replacing longhorn.example.com with your actual domain:
apiVersion: networking.k8s.io/v1
kind: Ingress
metadata:
  name: longhorn-production44
  namespace: longhorn-system
spec:
  ingressClassName: nginx
  rules:
  - host: longhorn.example.com
    http:
      paths:
      - pathType: Prefix
        path: "/"
        backend:
          service:
            name: longhorn-frontend
            port:
              number: 80
6. Apply the Ingress:
kubectl apply -f longhorn-ingress
7. Verify it's configured:
kubectl get ingress
Output:
NAME                    CLASS   HOSTS                ADDRESS          PORTS   AGE
longhorn-production   nginx   longhorn.example.com  203.0.113.5      80      2m20s
6. Access the Longhorn UI
1. Open your domain in a browser:
http://longhorn.example.com
Review your cluster's volumes, nodes, and storage summary on the dashboard.
Click Volume in the top navigation to view all Longhorn volumes and confirm your RWO and RWX volumes show a healthy state.
Click any volume to see replica count, snapshots, and backups.
From the volumes list, click Create Volume to provision a new one from the UI — enter the details and use the Access Mode dropdown to pick ReadWriteOnce or ReadWriteMany.
Click OK, then select the new volume and click Attach to assign it to a worker node with enough free space; pick the node from the Node dropdown and click Attach.
Confirm the volume shows a healthy state with Attached To set to your chosen node.
7. Back Up Longhorn Volumes to Object Storage
Longhorn backups work with any S3-compatible object storage for recovery or disaster-recovery volume creation.
- Get the Hostname, Access Key, and Secret Key for your object storage instance.
1. Create a Secret file for your object storage credentials:
nano objectstorage-secret.yaml
2. Add the following, replacing examplekey, examplesecret, and your-s3-endpoint with your real credentials:
apiVersion: v1
kind: Secret
metadata:
  name: longhorn-backup-secret
  namespace: longhorn-system
type: Opaque
stringData:
  AWS_ACCESS_KEY_ID: examplekey
  AWS_ENDPOINTS: https://your-s3-endpoint
  AWS_SECRET_ACCESS_KEY: examplesecret
3. Apply the Secret:
kubectl apply -f objectstorage-secret.yaml
4. Verify it exists:
kubectl get secrets -n longhorn-system
Output:
NAME                      TYPE                DATA   AGE
longhorn-backup-secret    Opaque              3      35s
5. In the Longhorn UI, go to Setting → General, scroll to Backup, and set the Backup Target to your bucket's S3 URI:
s3://example-bucket@your-s3-endpoint/
6. Enter your Secret's name (longhorn-backup-secret) in the Backup Target Credential Secret field, then press Enter to save.
Click Volume, select a target volume (e.g.
test-volume), and click Create Backup.Add a label if desired (e.g.
longhorn-backup/latest-backup), then wait for the backup to complete.Click Backup in the main navigation to confirm the new backup is listed.
Check your object storage bucket for a new
backupstoredirectory containing the backup objects.
Once backups are running, use Recurring Job in the Longhorn UI to automate them going forward.
Next Steps
Set up a Longhorn Recurring Job to automate volume backups on a schedule
Deploy stateful workloads (databases, queues) using the RWO or RWX StorageClasses you created
Monitor volume and replica health from the Longhorn UI dashboard
Test a disaster-recovery restore from your object storage backups to confirm your recovery process works
For the full guide with additional tips, visit the original article on Vultr Docs.